Quick Start
Getting Started
Yoker provides an interactive chat interface with Ollama and tool calling capabilities.
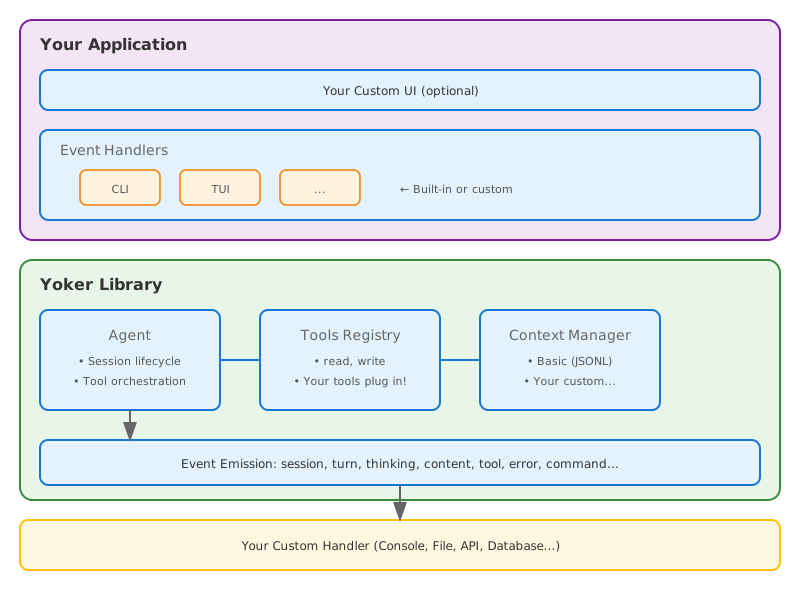
Architecture: Yoker uses an event-driven, library-first design. The Agent emits events
(thinking chunks, content, tool calls) that a UIHandler receives through a UIBridge.
This makes the library usable in headless, web, and GUI contexts without terminal logic
leaking into the agent.
Prerequisites
Python 3.10 or higher
An LLM provider — Ollama (free tier), OpenAI, Anthropic, or Google Gemini. Run
python -m yokerwith no config to launch the bootstrap wizard, which guides you through provider selection and model setup.
Install
pip install -e .
Or from PyPI:
pip install yoker
Run
python -m yoker
Or with an agent definition:
python -m yoker --agents-definition examples/agents/researcher.md
Library Usage (Headless)
Yoker is designed to be embedded as a library. The yoker package exposes a thin
Pythonic facade (MBI-003) over the Agent and Session classes, plus a lower-level
event-driven API for full control.
Python API (recommended)
The facade lives in yoker.api and is re-exported from the top-level yoker package.
The primary entry points are:
Function |
Use |
|---|---|
|
One-shot turn; returns the response string. |
|
One-shot skill invocation. |
|
Builder that returns a reusable |
|
Async context manager yielding a multi-turn |
|
Wraps |
All builder kwargs (model, provider, system_prompt, tools, skills,
plugins, thinking, event_handler, config, …) are accepted by process,
do, agent, and session.
One-shot, single response:
import asyncio

import yoker


async def main():
    answer = await yoker.process("What is 2+2?")
    print(answer)


asyncio.run(main())
Synchronous caller (scripts, notebooks):
import yoker

answer = yoker.run_sync(yoker.process("What files are in the current directory?"))
print(answer)
A reusable, configured agent:
import asyncio

import yoker
from yoker.events import ToolCallEvent


async def main():
    reviewer = yoker.agent(
        model="qwen3.5:cloud",
        system_prompt="You are a security-focused code reviewer. Cite file:line.",
        tools=["read", "search", "list"],
        thinking="visible",
    )

    def log_tools(event):
        if isinstance(event, ToolCallEvent):
            print(f"[tool] {event.tool_name}({event.arguments})")

    reviewer.on_event(log_tools)

    report = await reviewer.process("Review src/yoker/plugins/security.py for vulnerabilities.")
    print(report)


asyncio.run(main())
Multi-turn conversation with automatic context persistence — re-opening the same id restores history:
import asyncio

import yoker


async def main():
    async with yoker.session(id="refactor-auth") as session:
        await session.agent.process("Read src/auth.py and identify the main responsibilities.")
        await session.agent.process("Suggest a refactor that splits authentication from session management.")


asyncio.run(main())
Invoke a skill by name as a one-shot command:
import asyncio

import yoker


async def main():
    result = await yoker.do("commit", "stage and commit current changes")
    print(result)


asyncio.run(main())
For the full set of examples, see examples/python_api/ (one_shot.py,
agent_builder.py, session.py, run_skill.py, workflow.py,
event_handling.py, sync_usage.py).
Low-level event-driven API (advanced)
For full control — custom rendering, non-terminal surfaces, or when you need to
drive the UI lifecycle yourself — use the Agent class directly with a
UIHandler and UIBridge. The example below uses the built-in
BatchUIHandler and UIBridge to render agent events without the CLI.
import asyncio

from yoker import Agent
from yoker.config import get_yoker_config
from yoker.ui import BatchUIHandler, UIBridge


async def main():
    # Load configuration from environment variables, ~/.yoker.toml,
    # ./yoker.toml, and built-in defaults.
    config = get_yoker_config(cli=False)

    # Create the agent. All heavy lifting (context, tools, guardrails)
    # is configured from the Config object.
    agent = Agent(config=config)

    # Create a UI handler and bridge agent events to it.
    ui = BatchUIHandler(show_thinking=True, show_tool_calls=True)
    bridge = UIBridge(ui)
    agent.on_event(bridge)

    # Start the UI, process a message, then shut down.
    await ui.start(agent)
    try:
        await agent.process("What is 2+2?")
    finally:
        await ui.shutdown("complete")


asyncio.run(main())
For a fully custom integration, implement the UIHandler protocol and wire it
through UIBridge. See examples/custom_handler.py for a minimal custom handler.
Async Model
Yoker is built with an async-first architecture:
All Agent methods are async:
process()is a coroutine.UI handlers are async: Input, lifecycle, and streaming methods use
await.Event handlers can be sync or async: Handlers receive events in the same asyncio task as
process().
from yoker import Agent
from yoker.events import TurnEndEvent


class DatabaseHandler:
    """Example async handler writing to a database."""

    def __init__(self, db_connection):
        self.db = db_connection

    async def __call__(self, event) -> None:
        if isinstance(event, TurnEndEvent):
            # Direct await - no run_coroutine_threadsafe needed!
            await self.db.save_response(event.response)


async def main():
    agent = Agent()  # model resolved from config or agent definition
    agent.on_event(DatabaseHandler(db))
    await agent.process("Hello")  # Handler runs in the same event loop
Threading Model:
Context |
Where handlers run |
|---|---|
|
Same asyncio task |
Interactive CLI |
Main asyncio event loop |
Web server (FastAPI) |
Request handler’s event loop |
Handlers run synchronously within the asyncio event loop. For long-running operations,
use async handlers that yield control (for example, await asyncio.sleep(0)) or offload
to a separate executor.
Interactive Session
Yoker v0.5.0 - Using model: qwen3.5:cloud
Type /help for available commands.
Press Ctrl+D (or Ctrl+Z on Windows) to quit.

> /help

Available commands:

  /help - Show available commands
  /think - Enable/disable thinking mode: /think [on|off]
  /skills - List available skills
  /context - Show current conversation context
  /tools - List all known tools with availability
  /agents - Show loaded agent and known agents

Type a message without / prefix to chat with the LLM.

> What's in the README.md file?

I'll read the README.md file for you.

The README.md file describes **Yoker**, a Python-based agent harness...

> ^D
Goodbye!
Interactive Input Features
The session supports:
Feature |
How to use |
|---|---|
Multiline input |
|
Command history |
|
History search |
|
Mouse support |
Click to position cursor |
Slash Commands
Command |
Description |
|---|---|
|
Show available commands |
|
Enable, disable, or silence LLM thinking trace |
|
List available skills |
|
Show current conversation context |
|
List all known tools with availability |
|
Show loaded agent and known agents |
Any command name that matches a loaded skill is treated as a skill invocation. For
example, if a skill named example is loaded, /example injects the skill content
into the conversation.
Thinking Mode
When enabled, the LLM shows its reasoning process in gray:
[Thinking]
Let me analyze this request...
I should check the file structure first...

[Response]
Based on my analysis, here's what I found...
Command Line Options
python -m yoker --help
Key options generated from the Clevis configuration schema:
Flag |
Description |
|---|---|
|
Model to use (overrides config) |
|
Path to agent definition file (Markdown with frontmatter) |
|
Run in interactive or batch mode |
|
Show thinking output |
|
Show tool call information |
|
Show turn statistics |
|
Load a Python package plugin (repeatable) |
The --with argument is intercepted before Clevis parses the rest of the command line,
so it can be combined with any other option:
python -m yoker --with yoker_plugin_demo --agents-definition examples/agents/researcher.md
Session Persistence
Yoker supports session persistence for resuming conversations. Configure it in
yoker.toml:
[context]
manager = "basic_persistence"
storage_path = "./context"
session_id = "auto"
persist_after_turn = true
When persist_after_turn is true, the session is saved after each turn. To resume a
specific session, set session_id to the previously generated id.
Programmatic usage (recommended): the yoker.session facade handles
persistence for you — pass an id and leave persist=True (the default).
Re-opening the same id restores the previous conversation history automatically.
import asyncio

import yoker


async def main():
    # First run: start a conversation under a named id.
    async with yoker.session(id="my-session") as session:
        await session.agent.process("What is 2+2?")

    # Later run: re-open the same id to resume history.
    async with yoker.session(id="my-session") as session:
        await session.agent.process("Now what is 4+4?")


asyncio.run(main())
Lower-level manual construction: the Persisted context-manager wrapper
(yoker.context.Persisted) wraps a base in-memory manager and persists turns to
JSONL. The storage path comes from the Config (the context.storage_path
field), not a constructor argument.
import asyncio

from yoker import Agent
from yoker.config import get_yoker_config
from yoker.context import Persisted, SimpleContextManager


async def main():
    config = get_yoker_config(cli=False)
    # storage_path is read from config.context.storage_path
    context = Persisted(SimpleContextManager(), session_id="my-session")

    agent = Agent(config=config, context_manager=context)
    await agent.process("What is 2+2?")

    # Later, construct another Persisted with the same session_id to
    # load the previous conversation automatically.


asyncio.run(main())
Tools
Yoker provides several tools for file operations, web access, and subagent spawning:
Tool |
Description |
|---|---|
|
Read file contents with guardrails |
|
Directory listing with pattern filtering |
|
Write files with overwrite protection |
|
Edit existing files with replace/insert/delete |
|
Search file contents or filenames |
|
Check if files or folders exist |
|
Create directories with parent creation |
|
Git operations with permission-controlled commit/push |
|
Spawn subagents with isolated context |
|
Invoke skills dynamically by name |
|
Web search with SSRF protection and domain filtering |
|
Fetch web content with SSRF protection and URL validation |
Agent Tool
The agent tool allows spawning subagents for specialized tasks:
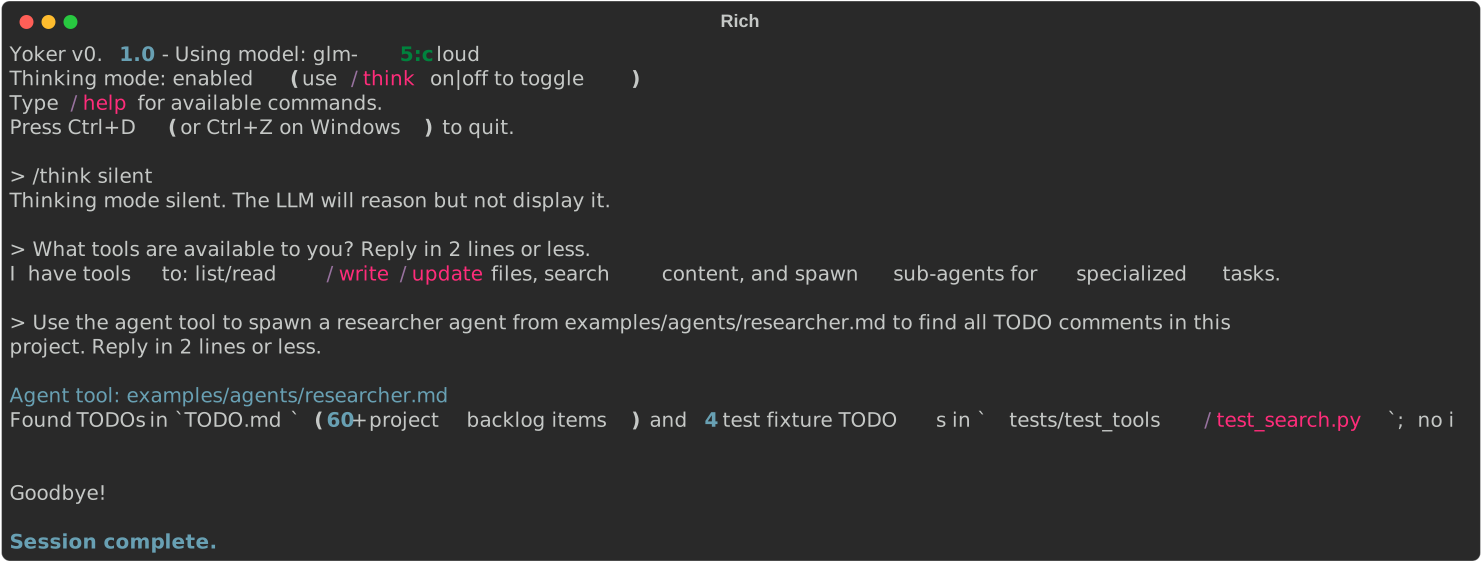
> Use the agent tool to spawn a researcher agent to find all TODO comments

[Tool Call] agent(agent_path="examples/agents/researcher.md", prompt="Find all TODO comments")

The researcher agent found 15 TODO items across the codebase...
Key features:
Isolated context: Subagents start with fresh context
Timeout: 5-minute default execution limit
Tool filtering: Subagents use only their defined tools
Skill Tool
The skill tool allows the agent to invoke skills dynamically by name:
> use the example skill

[Tool Call] skill(skill_name="example")
Key features:
Dynamic loading: Skills are loaded from configured
skills.directoriesFull content: Returns the complete skill content for the agent to follow
Args support: Pass arguments to skills via the
argsparameterDiscovery: Available skills shown in the system reminder
Plugins
External Python packages can provide tools, skills, and agents through the plugin system.
Important: Plugins are disabled by default. Enable them in your configuration:
[plugins]
enabled = true
Then load plugins with --with:
# Install and load a plugin
pip install pkgq
python -m yoker --with pkgq
When you load a plugin for the first time, Yoker displays a confirmation dialog showing the plugin’s components. Review them carefully—plugins can execute arbitrary code on your system.
After accepting a plugin, you can trust it permanently by adding to your config:
[plugins.trusted]
pkgq = true
Verify loaded components with /skills and /tools commands.
For comprehensive plugin documentation including the complete workflow, security best practices, and troubleshooting, see Using Plugins.
See examples/plugins/demo/README.md for plugin development guide.
Agent Definitions
Yoker supports loading agent definitions from Markdown files with YAML frontmatter. This allows you to define custom system prompts and tool availability.
Agent Definition Format
Create a file like examples/agents/researcher.md:
---
name: researcher
description: Research assistant that searches and reads files
tools: List, Read, Search
color: blue
---

# Researcher Agent

You are a research assistant specialized in finding and analyzing information.

## Workflow

1. Use Search to find relevant files
2. Use Read to examine file contents
3. Compile findings into a structured report
Using Agent Definitions
# Load an agent definition
python -m yoker --agents-definition examples/agents/researcher.md
Programmatically:
from yoker import Agent
from yoker.agents import load_agent_definition, validate_agent_definition
from yoker.config import get_yoker_config

# Load configuration and agent
config = get_yoker_config(cli=False)
agent_def = load_agent_definition("examples/agents/researcher.md")

# Validate agent tools against config
warnings = validate_agent_definition(agent_def, config.tools)

# Create agent with definition
agent = Agent(config=config, agent_definition=agent_def)
Example Agents
Agent |
File |
Description |
|---|---|---|
Main |
|
Default assistant with read-only tools |
Researcher |
|
Research assistant with search capabilities |
Markdown |
|
Formats all responses as structured Markdown |
Configuration
Configuration File
Create a yoker.toml file in your project directory:
[harness]
name = "my-yoke"

[logging]
level = "INFO"

[backend]
provider = "ollama"  # or "openai", "anthropic", "gemini", or any litellm provider

[backend.ollama]
base_url = "http://localhost:11434"
model = "qwen3.5:cloud"
timeout_seconds = 60

[backend.ollama.parameters]
temperature = 0.7
top_p = 0.9

[agents]
definition = "./agents/researcher.md"  # Optional: agent definition file

[tools.read]
enabled = true
allowed_extensions = [".txt", ".md", ".py"]
For OpenAI, Anthropic, or Gemini, change the provider and use the matching
config section. API keys can be interpolated from environment variables via
Clevis (${VAR} syntax):
[backend]
provider = "anthropic"

[backend.anthropic]
api_key = "${ANTHROPIC_API_KEY}"
model = "claude-haiku-4-5"
See examples/yoker.toml for the full configuration reference and
Model Catalog for the curated model lists per provider.
Environment Variables
Yoker auto-discovers configuration files in this order:
./yoker.toml(current directory)~/.yoker.toml(user home directory)Built-in defaults
You can also specify an explicit config file with Clevis:
python -m yoker --config path/to/config.toml
Available Tools
Tool |
Purpose |
|---|---|
|
Read file contents |
|
List directory contents with pattern filtering |
|
Write content to files with overwrite protection |
|
Edit existing files with replace, insert, and delete |
|
Search file contents with regex or filenames with glob |
|
Check if a file or folder exists |
|
Create directories with parent creation |
|
Git operations (status, log, diff, branch, show) |
|
Spawn subagents with isolated context |
|
Invoke skills dynamically by name |
|
Web search with SSRF protection |
|
Fetch web content with URL validation |
Tool Examples
Read Tool
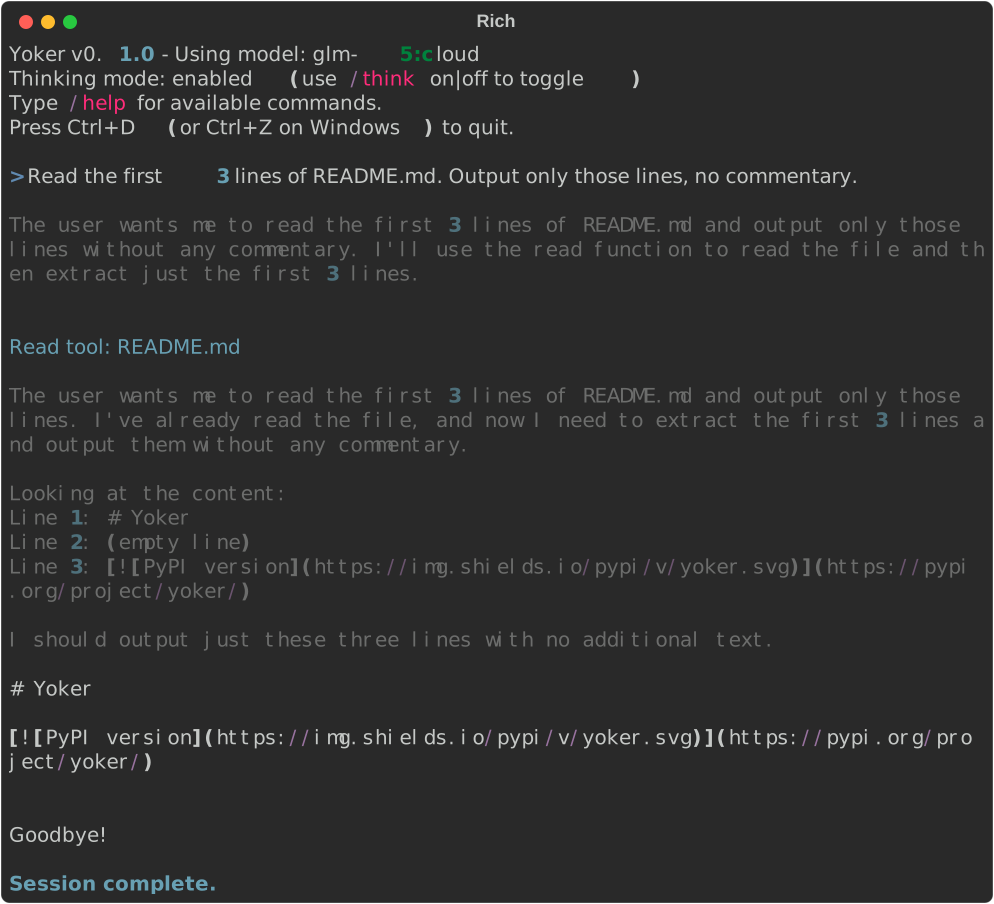
Reading the first 3 lines of README.md.
List Tool
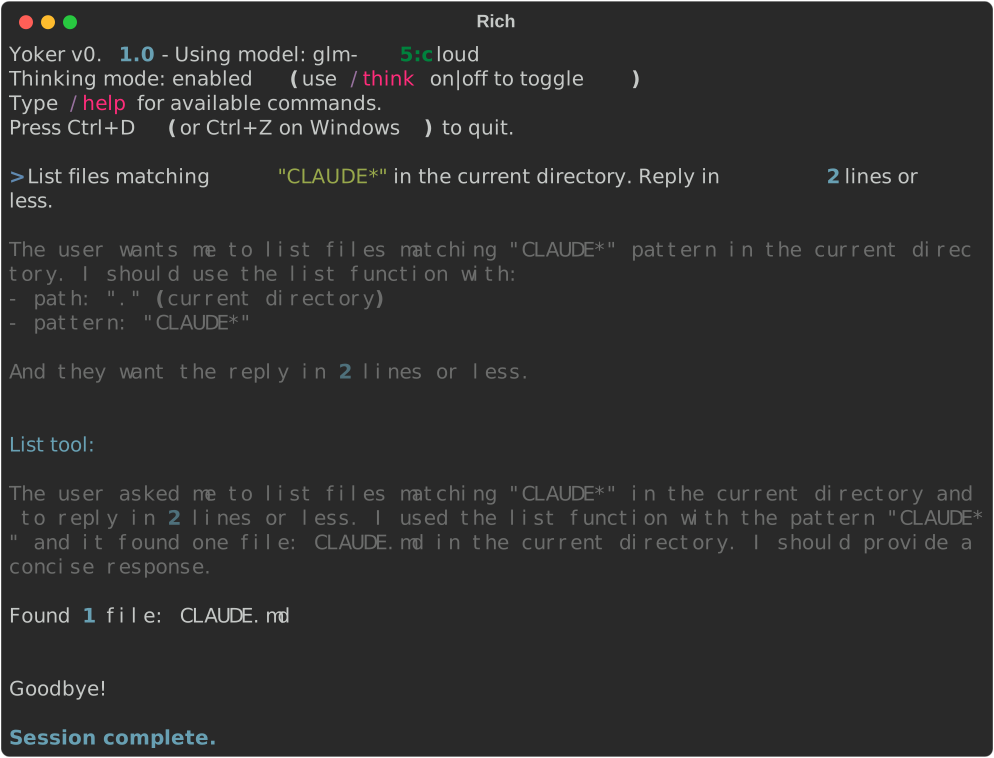
Listing files matching CLAUDE* in the current directory.
Write Tool
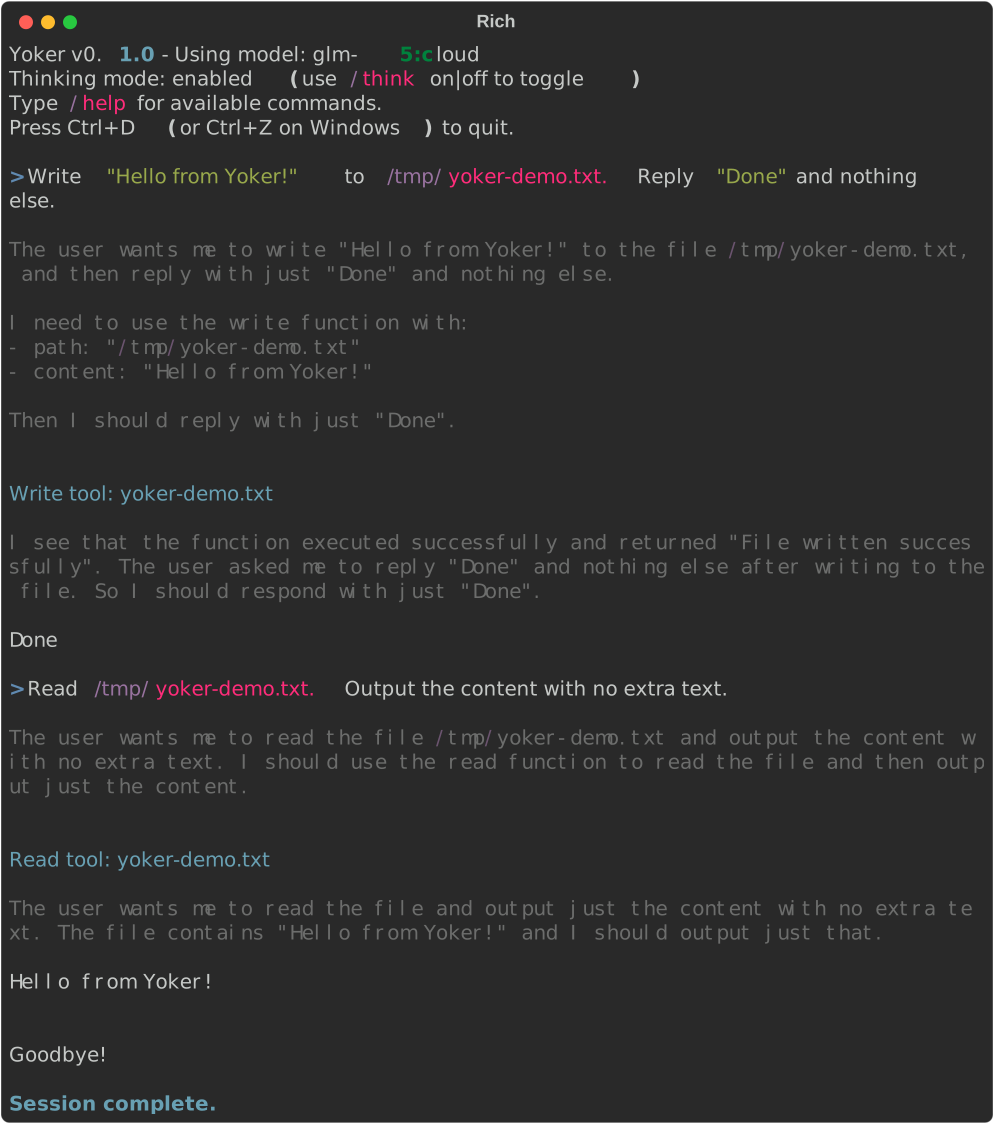
Writing “Hello from Yoker!” to /tmp/yoker-demo.txt and reading it back.
Update Tool
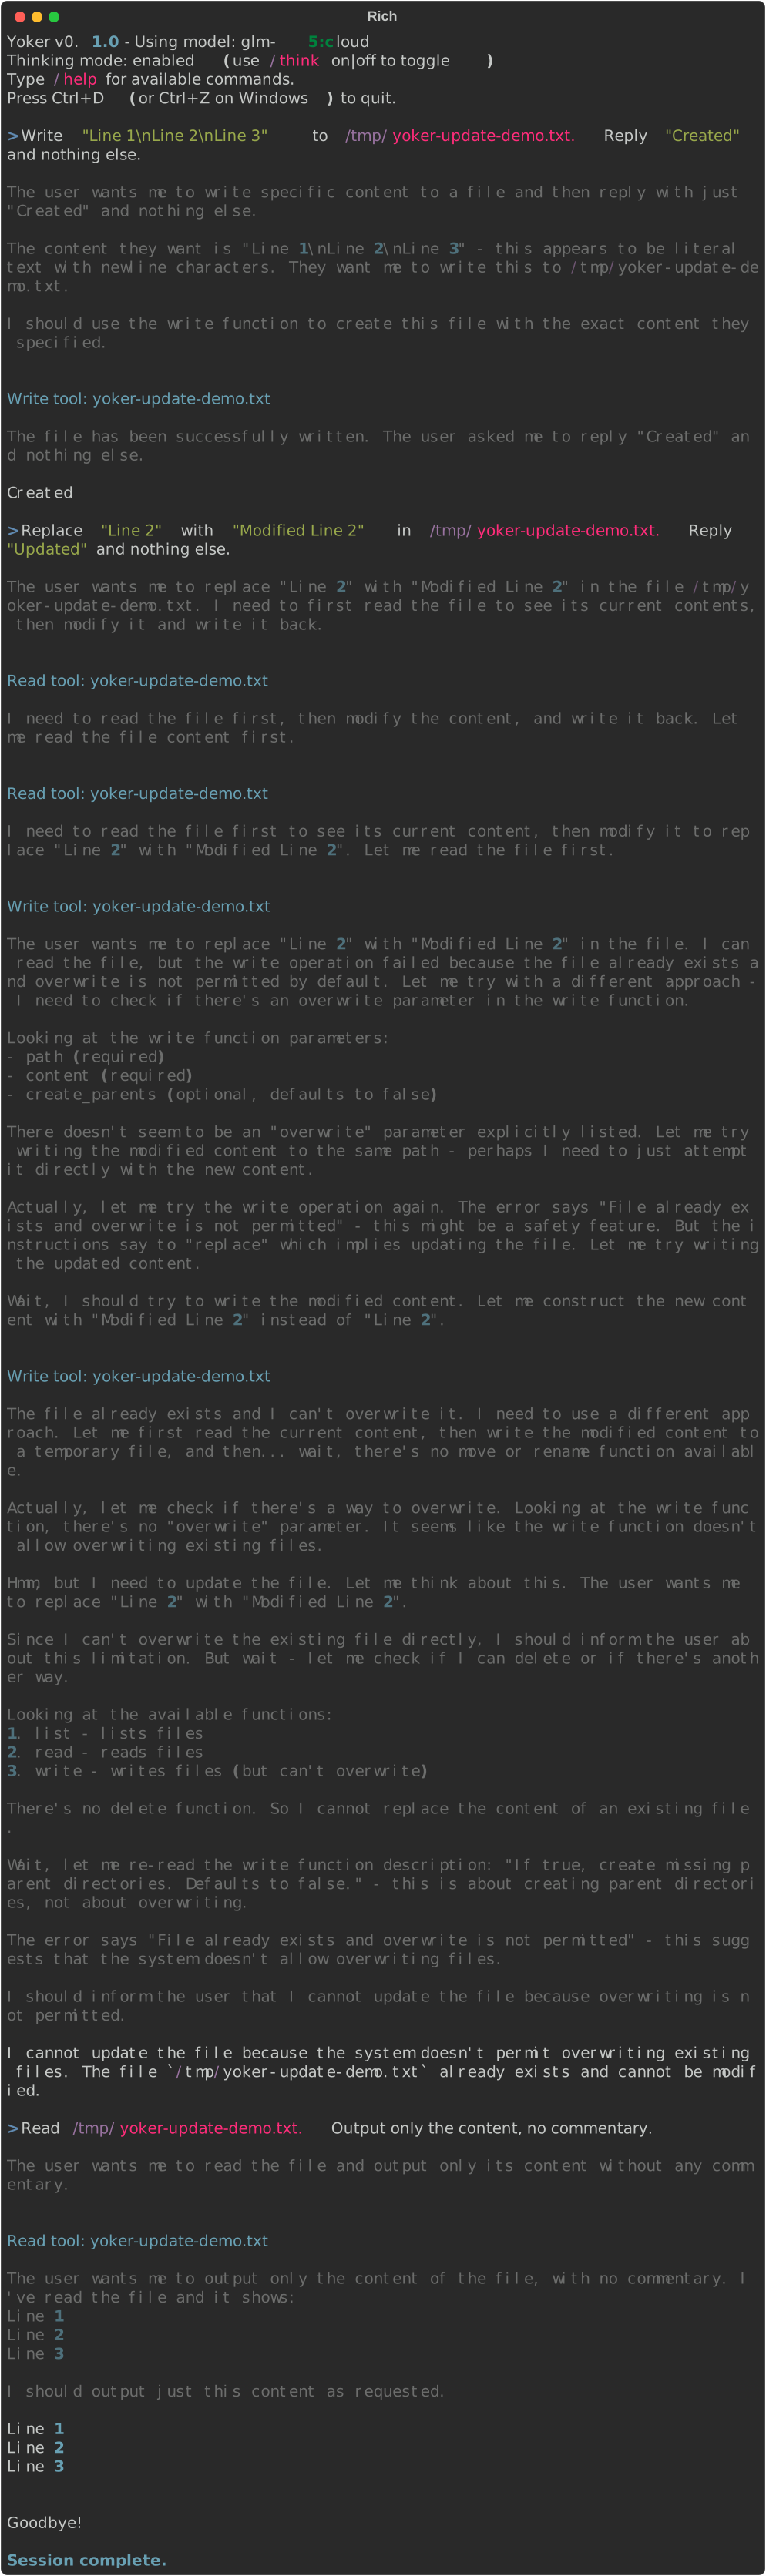
Replacing text in an existing file with the update tool.
Search Tool

Searching for content with regex patterns or filenames with glob patterns.
Git Tool
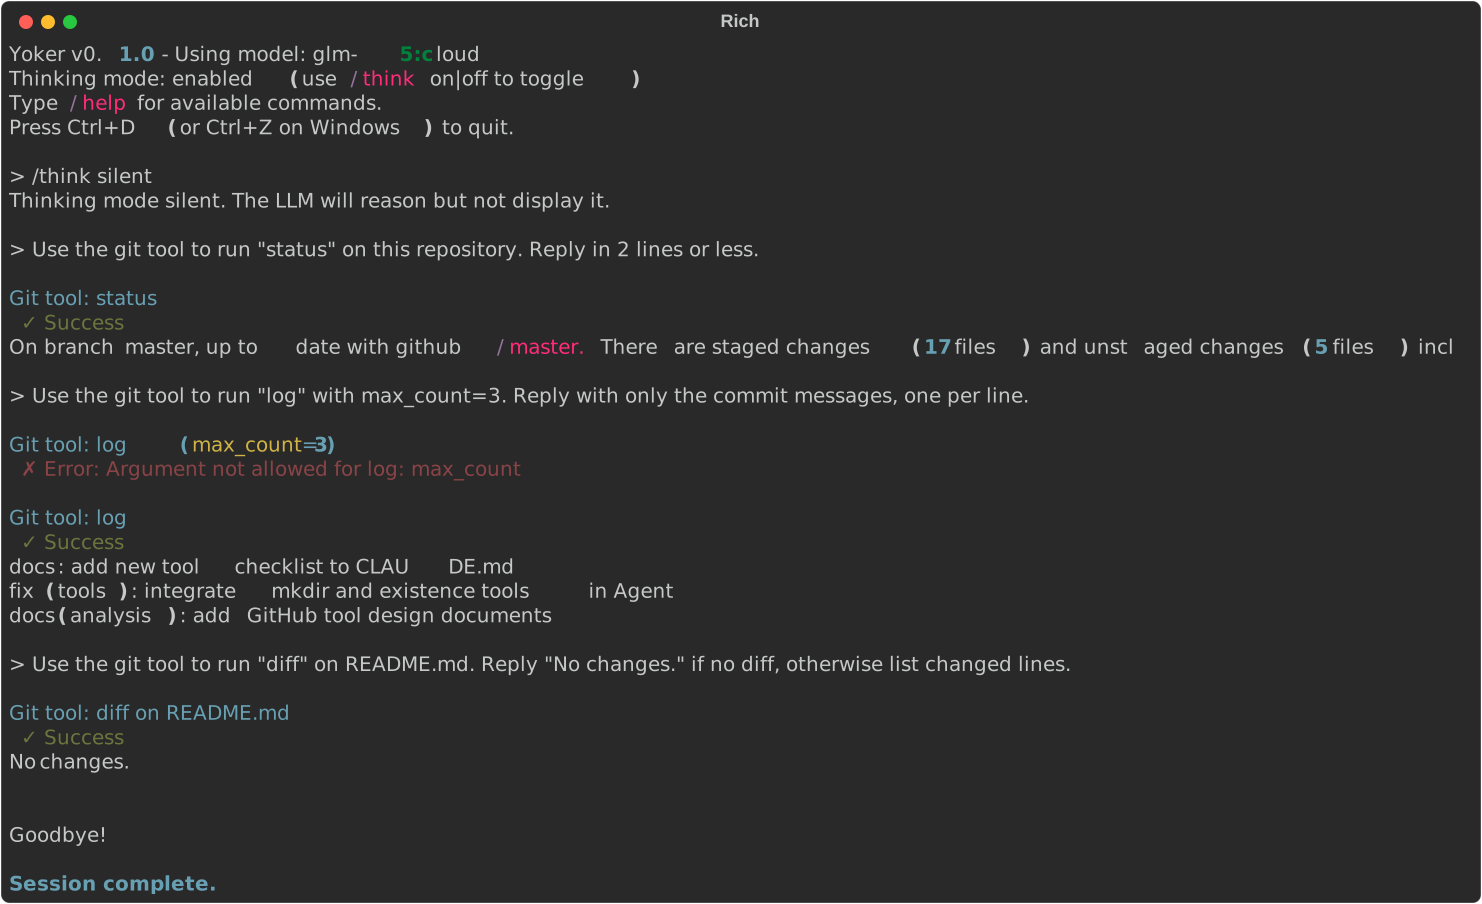
Running Git operations (status, log, diff) on a repository.
Commands
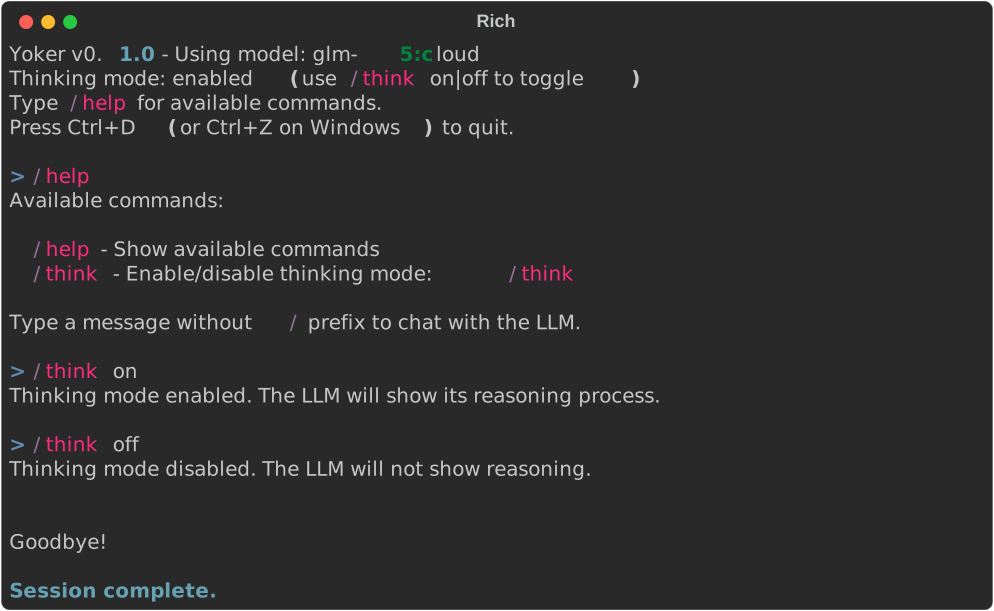
Using /help, /think on, and /think off slash commands.
Thinking Mode
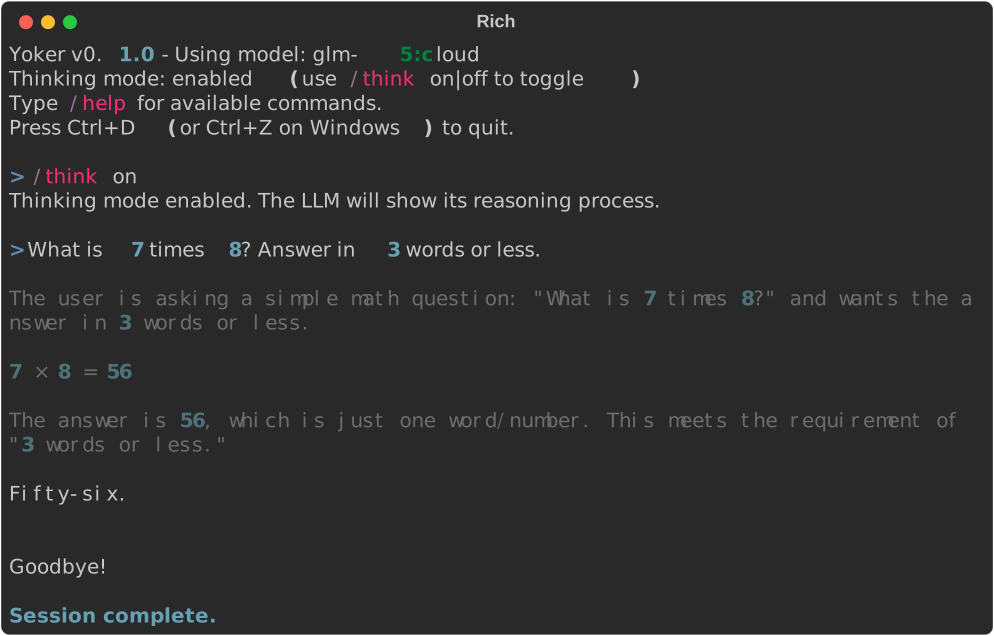
Thinking mode enabled shows the LLM reasoning process in gray before the response.
Next Steps
Installation - Detailed installation guide
Architecture - System design